 Deutsch
 English
Tube & tire repair - Everything you need to know about puncture repair and what you need for it
A puncture while riding is annoying for all cyclists. Whether you are riding with a classic bicycle tube made of butyl, TPU (thermoplastic polyurethane) or latex or using a tubeless system - the repair is often quicker and easier than many people think. With the right tools and a little know-how, you can repair damage to your tube or tire in just a few minutes and continue riding with peace of mind.
Let's take a quick look at the differences between tubular and tubeless tire repairs and which tools and aids will help you best in the event of a puncture.
want read more.
Repairing bicycle tubes: Differences between butyl, TPU and latex
Bicycle tubes are the classic, new bikes are often delivered with tubes, a tubeless kit for later conversion may be included. Or you have a bike that you only use sporadically - here too, the use of tubes is a good option. Depending on the intended use or degree of wear on your tire, your tube will sooner or later come into contact with sharp objects such as nails, thorns or broken glass - or a snakebite will haunt you 😉. In this case, you can of course insert a new tube and continue riding. This is also a good idea during a tour or a competition! However, it is often worth repairing the old inner tube and using it again at the next opportunity. Depending on the material of the inner tube, there are special repair methods.
1. butyl tube - the standard tube
Most bicycle inner tubes are made of butyl, a durable and relatively elastic rubber material. This type is widely used and is easy to repair.
How to repair a butyl tube:
- Clean the damaged area and lightly roughen it with the included sandpaper from a patch kit
- Apply a thin layer of vulcanizing solution to the damaged area and allow it to dry for 1-2 minutes until it becomes slightly tacky
- Apply the patch and press firmly into place. Wait a few minutes before refitting the hose
Advantage: Butyl tubes are inexpensive, easy to repair and very robust.
2. TPU tubes - light but sophisticated
Tubes made from thermoplastic polyurethane (TPU) are particularly lightweight and ideal for anyone who wants to reduce the weight of their bike. A TPU tube is also very robust and resistant to punctures, which promises good puncture resistance. The low friction of the material also increases performance. The tire rolls with low rolling resistance, giving you a smoother ride. The only disadvantage of TPU tubes is the higher purchase price compared to standard butyl tubes.
How to repair a TPU tube:
- TPU tubes require special TPU patch kits, as conventional patch kits for butyl usually do not stick. You can often find a suitable patch kit from the tube manufacturer
- Take a look at the repair instructions of the respective manufacturer, as these may differ in details or procedures compared to the repair of a butyl tube. You will often also find self-adhesive patches, which reduce the repair to a minimum as the vulcanization process as with butyl tubes is no longer necessary
3. latex tubes - for performance fans
Latex tubes are particularly popular due to their low rolling resistance, lower weight (compared to butyl tubes) and improved ride feel. Again, they lose air more quickly and should be checked for the required air pressure before every ride.
How to repair a latex tube:
- Use special vulcanizing material that is matched to the latex material
- Make sure that the adhesive is only applied in a very thin layer - latex reacts sensitively to overdosing
- Fix the patch particularly carefully, as latex tubes are under greater tension when inflated
- Handle the tube with care during the entire repair and subsequent assembly and keep the surfaces in the tire and on the inside of the rim free of grease and oil, as latex tubes are more sensitive to these substances
Repairing broken tubeless tires
Unlike conventional bicycle tubes, tubeless tires do not have a separate tube. However, punctures can also occur here, especially in the case of larger punctures or cuts that the tubeless milk cannot seal on its own. Here you can find out how to convert your bike to tubeless:Convert bike to tubeless.
1. minor damage: tubeless milk works wonders
Tubeless sealant, also known as sealant, automatically seals small holes (e.g. caused by thorns or screws). After removing the object, it is often sufficient to lift the wheel and let it rotate for a few seconds so that the sealant seals the area.
Note: If there is too little fluid in the tire, you should top up the milk to maintain the sealing effect.
2. repair kits for medium-sized damage
For slightly larger punctures that the tubeless milk can no longer seal, the use of special tubeless repair kits is recommended.
This is how the repair works:
- Use repair rubbers (tubeless sausages or tubeless strips), which are inserted into the damaged area with a special tool (e.g. an awl)
- Carefully unscrew the tool so that the strip remains in the tire and seals the area
- Check the tire pressure and let the wheel rotate for a few seconds so that the sealant finally seals this area
3. major damage: patch repair or replacement of the tire
Large cracks or cuts that extend over several centimetres often cannot be repaired by simple means. In such cases, it is necessary to patch the tire from the inside with a special patch or replace the tire completely.
Tools and aids for repairs
The right equipment is crucial to be able to repair a puncture quickly. Here are some of the most important tools for tube and tire repairs:
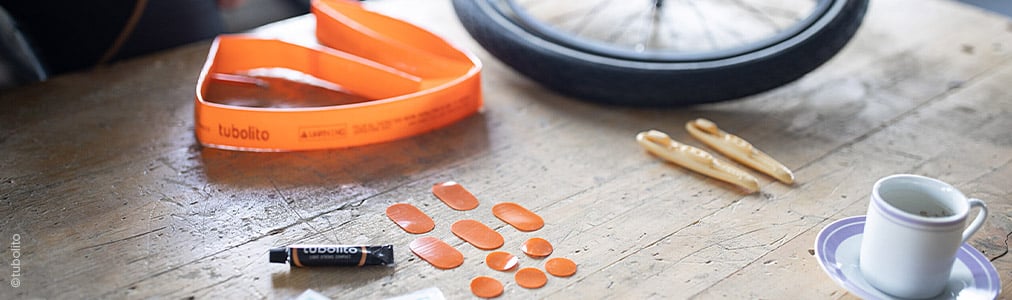
- patch kits: For butyl and latex tubes, there are universal patch kits with vulcanizing solution, patches and sandpaper. Special TPU repair kits should be used for TPU tubes
- tubeless repair kits: Contain repair strips, tools and spare parts for light and medium damage
- tire levers: Essential to get the tire off the rim quickly
- sealant syringes and valve wrench: Ideal for topping up tubeless milk quickly and cleanly, and for removing or cleaning valves
- mini pumps or CO2 cartridges: Perfect for quickly re-inflating or filling the tire on the go, especially with tubeless systems that require a powerful blast of air to reseal the tire.